The Conference webpage can be changed at any time, from any
point by any number of co-editors.
With a user-friendly graphical editor.
Website editor
Conference website editor allows for change of conference website from any location using standard web browser. Work may be distributed among people, so several co-organisers edit different sections of the webpage at the same time. Access to various parts of the document (e.g. symposia sub-pages) may be arbitrairly granted, which enforces smooth team-work and clearly defines responsibility ranges.
The website editor is a small, convenient application similar to Word, running in your web browser (see compatibility specifications). You may insert and edit images, lists or tables. It needs no installation so can be used even in Internet cafés.
Image manager
To start using the Image Manager, click on the insert image icon, this will bring up a new dialog like Figure 2.
![]()
Figure 1. Insert image icon, click to start the Image
Manager.
On-line editor processes text stored on a remote server. Therefore images must be uploaded to the server in order to be seen in the editor. This is done by the "Image Manager" button (Fig.1). New window will open. Browse and upload buttons will be available. Please follow these steps:
- Click the "Image Manager"
 icon and wait for new window to be opened
 - Click "Browse" button and select image file to be inserted
- Click "Upload" button and wait for a thumbnail of the image to appear on the list of pictures
- Click on the thumbnail of the image
- Adjust size/position parameters if necessary
- Click OK button - the image should appear in the abstract
Common mistake: images moved by copy/paste from a local wordprocessor will not appear beacause copy/paste provides only a link to the image on your local machine, which is not accessible from the remote server. Please use procedure described above to insert images.
User Interface

Figure 2. The Image Manager interface.
- Current Directory - Directory listing drop down, shows the current viewing folder. Selecting a different directory will change the view to the selected directory. You can also click the "Up" button to go up the directory.
- Create New Folder - You can create new folders/directories in the current directory. This bring forward a new dialog asking for the new folder name.
- Thumbnail Preview - This is the main film strip view of the current directory. Only images and folders will be shown. All non image files will be hidden. All temporary files and folders will also be hidden. Select Image by clicking on the thumbnail. The image details suc as the width, height, filename are updated in the fields above and near marker 4 in Figure 2. Browser Folders by clicking on the folders. Edit Image by clicking on the "pencil" icon , see marker a) in Figure 2. Delete Image or Folder by clicking on the trash can icon, see marker b) in Figure 2.
- Upload Image - To upload a new image to the current folder, click on the browser button to bring up a file selection dialog. Select the file to upload and click on the "upload" button. Depending on the filesize and connection speed, it may take a while to upload.
- Insert Image into editor - After selecting the desired image, click "OK" to insert the image into text. You can modify the parameters of the image after insertion by selecting the image (click on the image) and then click on the "insert image" icon (see Figure 1) to bring up the insert image dialog once more.
The Image Editor
The user interface in Figure 4 is displayed after clicking on the edit buttons (see marker 2 in Figure 2) in the Manager. The interface will centre it on the screen when the image is completly loaded.
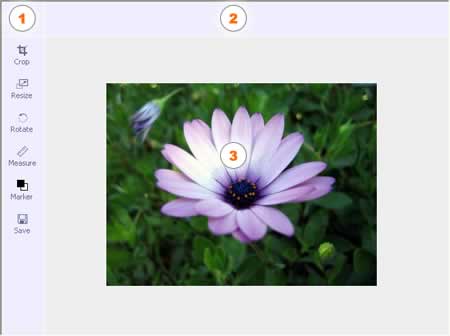
Figure 4. The Image Editor user interface.
The main editor interface is divided into 3 areas.
- A vertical toolbar with a list of available tools:
- Crop, Resize, Rotate, Measure, Marker, and Save.
- The options for each of the tools are shown here. For example, click on the crop icon to see the crop options.
- This is the image that you are editing. The image is not saved on to the system until you explicitly save it.
Cropping
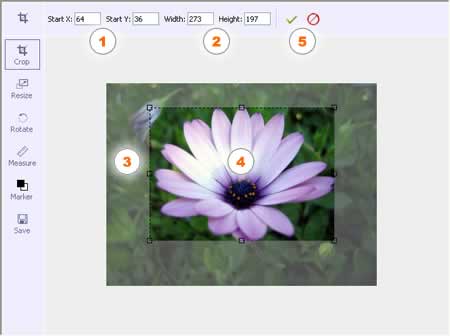
Figure 5. Cropping the image.
Rotating
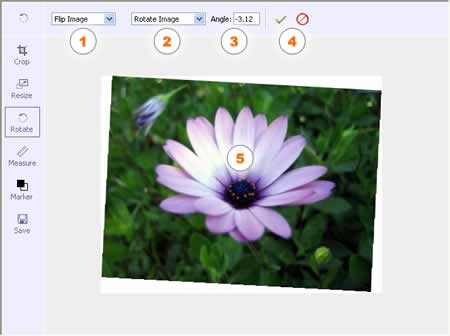
Figure 7. Rotating the image.
Measurements
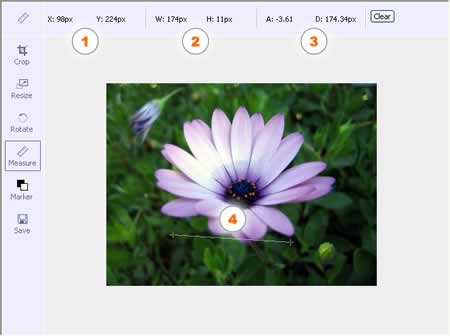
Figure 8. Measuring the distance and angle between to points.
Saving the Edited Image
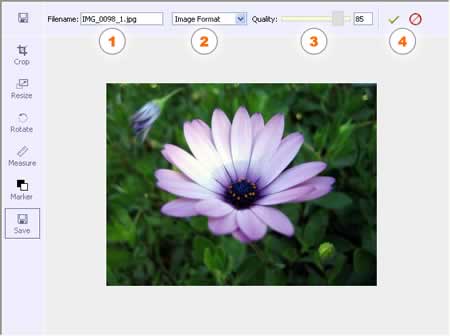
Figure 9. Saving the image.
Credits
Author: Xiang Wei Zhuo, email: xiangweizhuo(at)hotmail.com
Attachments
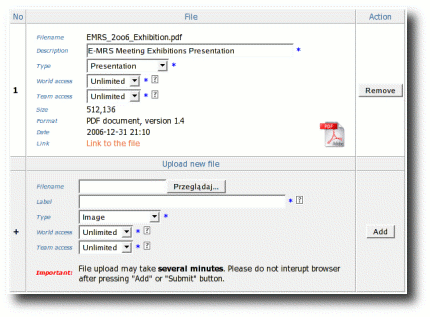
Attachment option allows to upload files to The Conference Engine server. The files may be:
- PDF documents
- presentations
- video clips
- maps, images, etc.
- Filename - specify name of the file to be uploaded or (better) use "Browse" button to select the file directly from the local filesystem.
- Label - a name to be displayed in "Downloads" section of the website. This should be short and informative for the users (e.g. "Printable programme", "Welcome video clip").
- Type - a selection of content types. Please choose one that describes best the file being attached.
- World access - file access policy for everyone in the Internet.
- Team access - describes access policy for registered users only.
Once the file is uploaded to the server, it becomes accessible by the link provided ("Link" field). You may copy this link and paste whereever you wish in the section content.